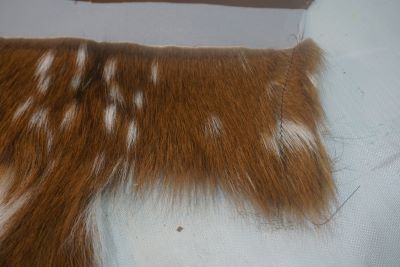
I used the tail of a deer hide as the flap of this handbag.
Cutting the tail:
I started with a different fabric for the base of the bag. I ended up with dark brown pig skin instead of the fabric in the video. I hope the deer and the pig will get along. It was hard to find a color the complimented the hide colors.
Next I decided on the style of the bag. I chose a curved bottom instead of the rectangle in the video. Pattern: All Dunn Designs Le Bag. I enlarged it slightly so it would be the length of the tail.
I lined the flap by tracing around the back side of the deer hide. Cut the lining (satin) and interfacing adding a 1/4" seam allowance.
With right sides together I stitch around the lining and interfacing leaving the top open. Clipped curves (I like to use pinking shears) and turned.
The interfacing turned down the outside edge beautifully.
Stitching the lining on the hide was easy, With wrong sides together I stitched it on the machine. Lining side up.
Brushed the fur out of stitching.
Next I stitched the lining for the bottom putting in the pocket sizes I like. When stitching together lining sides, I left an opening at the bottom for turning.
Inserted tabs with rings at top where I wanted the handles. Added the magnetic snap in the lining (always reinforce under snaps)
Stitched top of bag with flap right side against pig skin (sandwiched between lining and pig skin). Turned the bag right side out through the lining opening.
I made the handle from a gorgeous decorative strap inserting hooks on the end which hooked to the rings. The bag was finished in no time!
Cotton will need stabilizer (usually soft) quilting works well on the cotton.
Stabilizers:
Fleece, batting, felt, foam,
woven and non-woven interfacings, (new) woven fuse 2
Cardboard (non-washable), Deco magic fusible interfacing or Decovil heavy and lite.
Pre-treating fabrics:
Just like in garment sewing, pre-treating is important. Treat the fabric as you will treat it after you wash it.
Interfacings that are cotton will shrink. Polyester doesn’t BUT the fabric you put it on can shrink after you fuse. Sometimes there is a excessive amount of glue on the fabric and can cause more stiffness then you had anticipated. ALWAYS TEST fabric and interfacing before you apply.
I was commissioned to be part of a very special quilt. You may have read my post in May 2018 about a baby quilt made from the dress of Laura McComb. Here is the link if you would like to read the story.
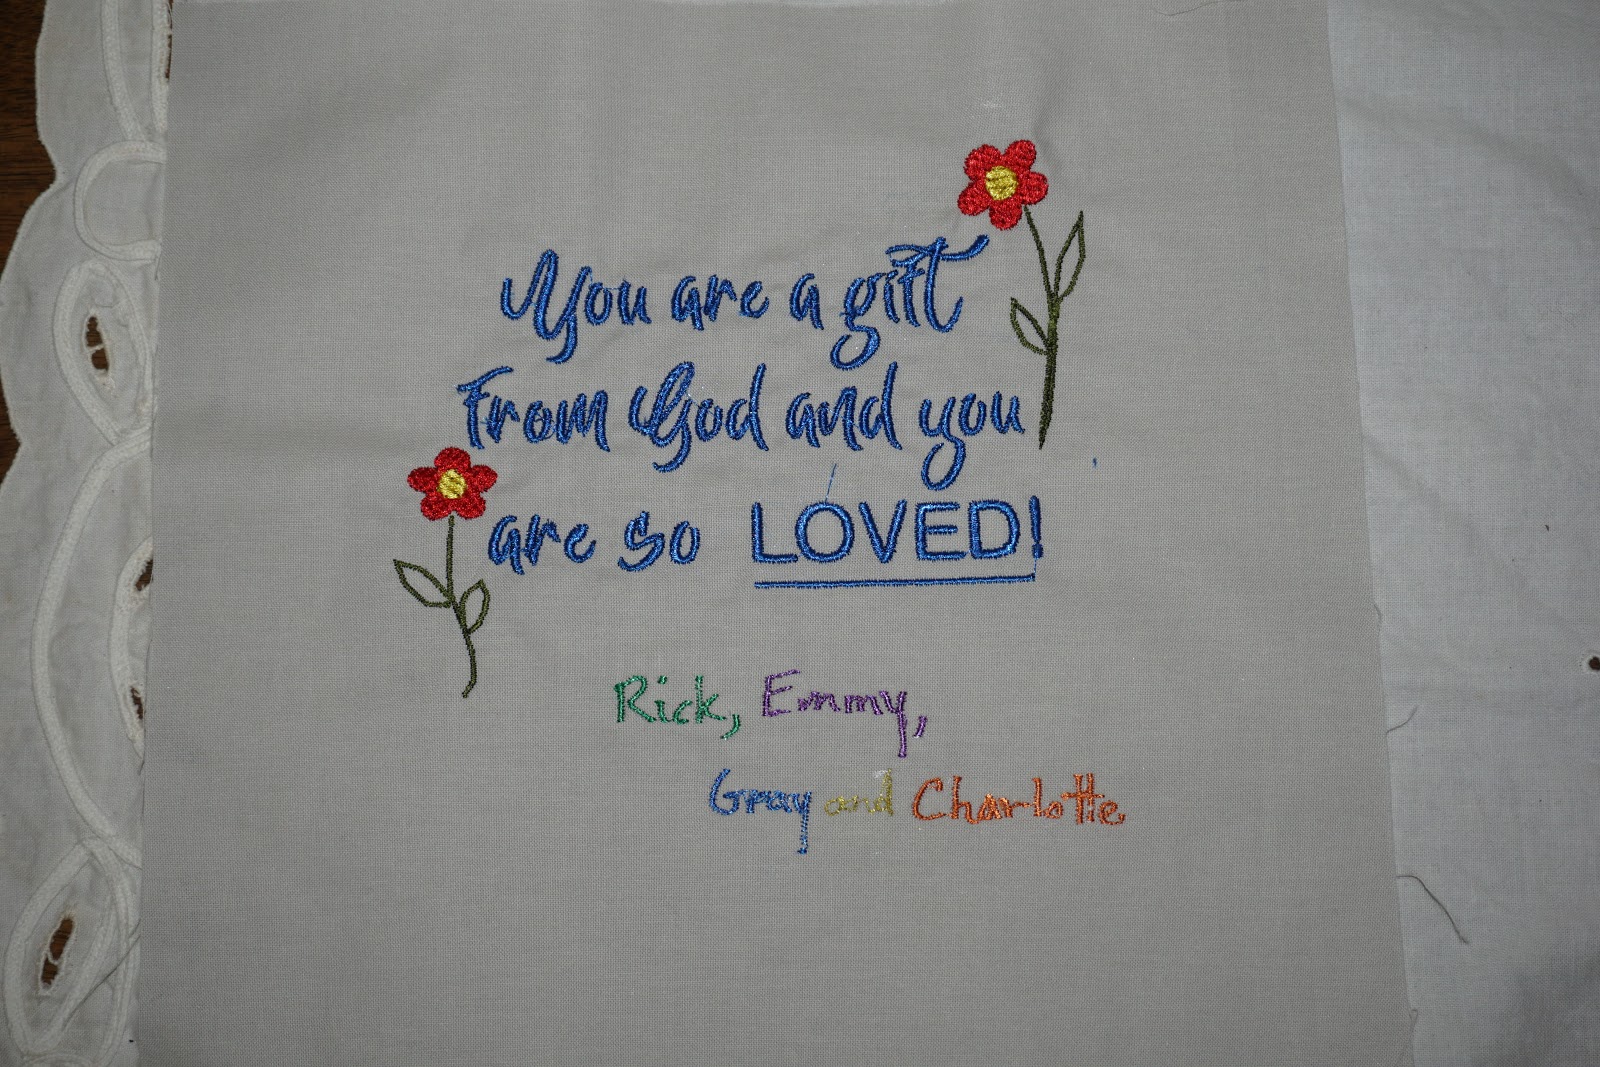
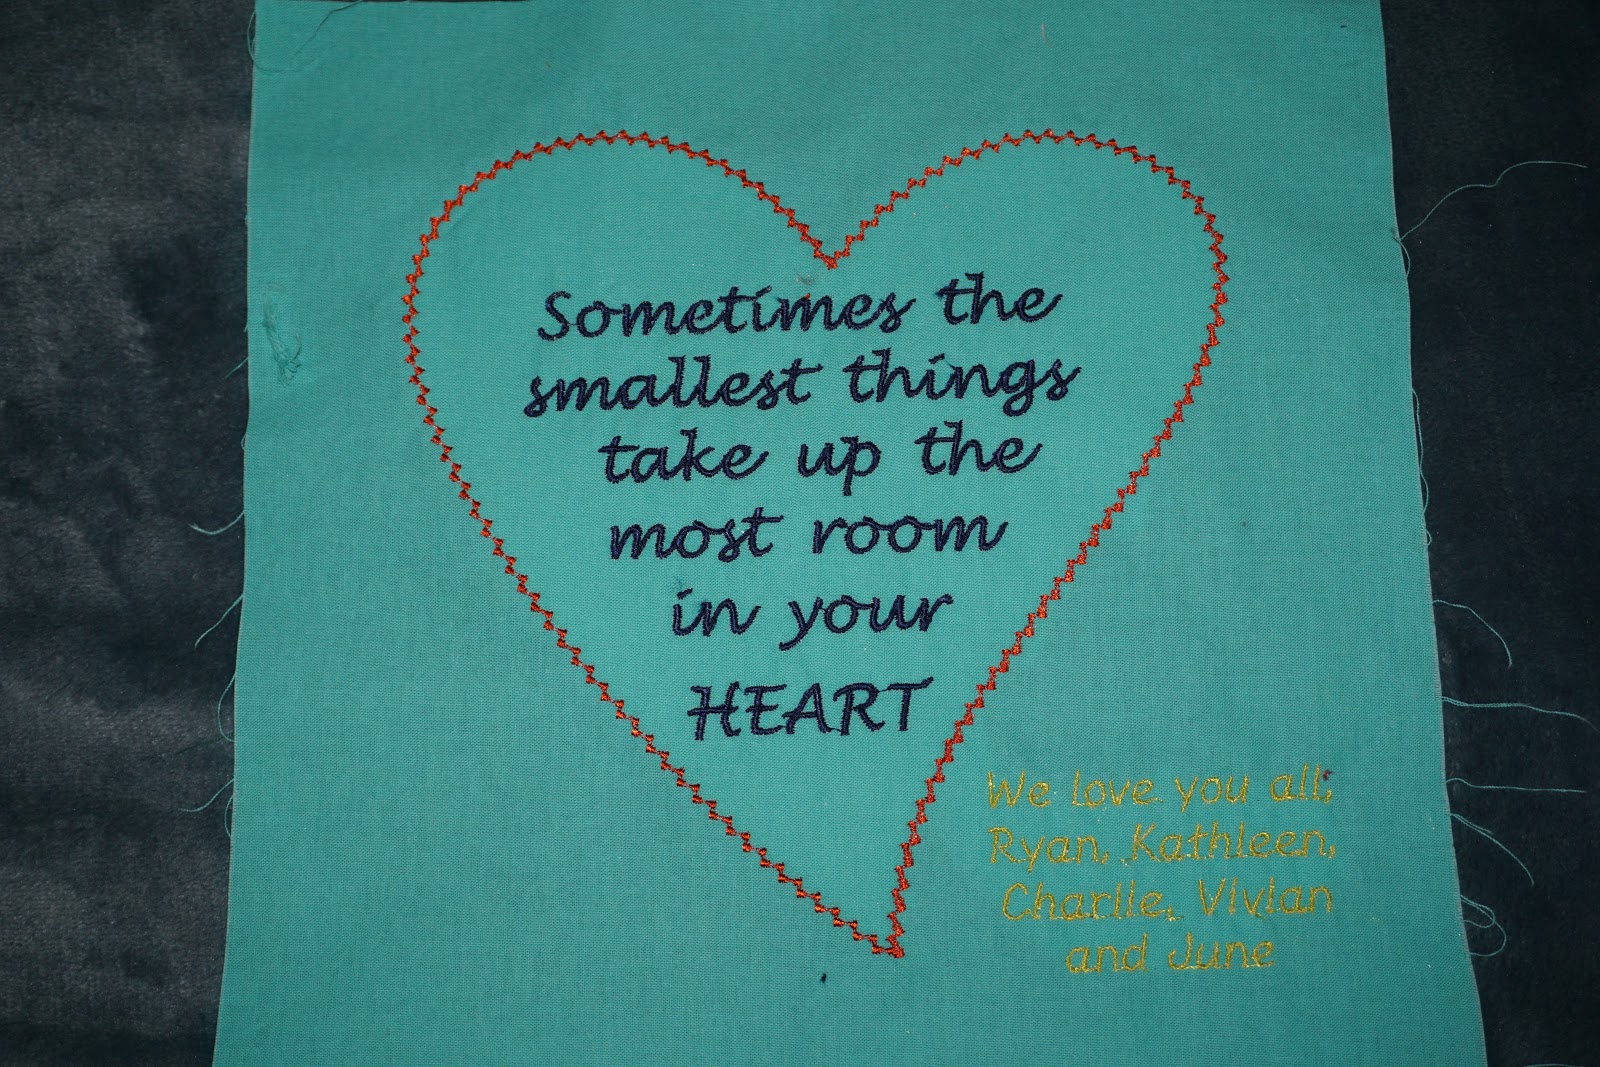
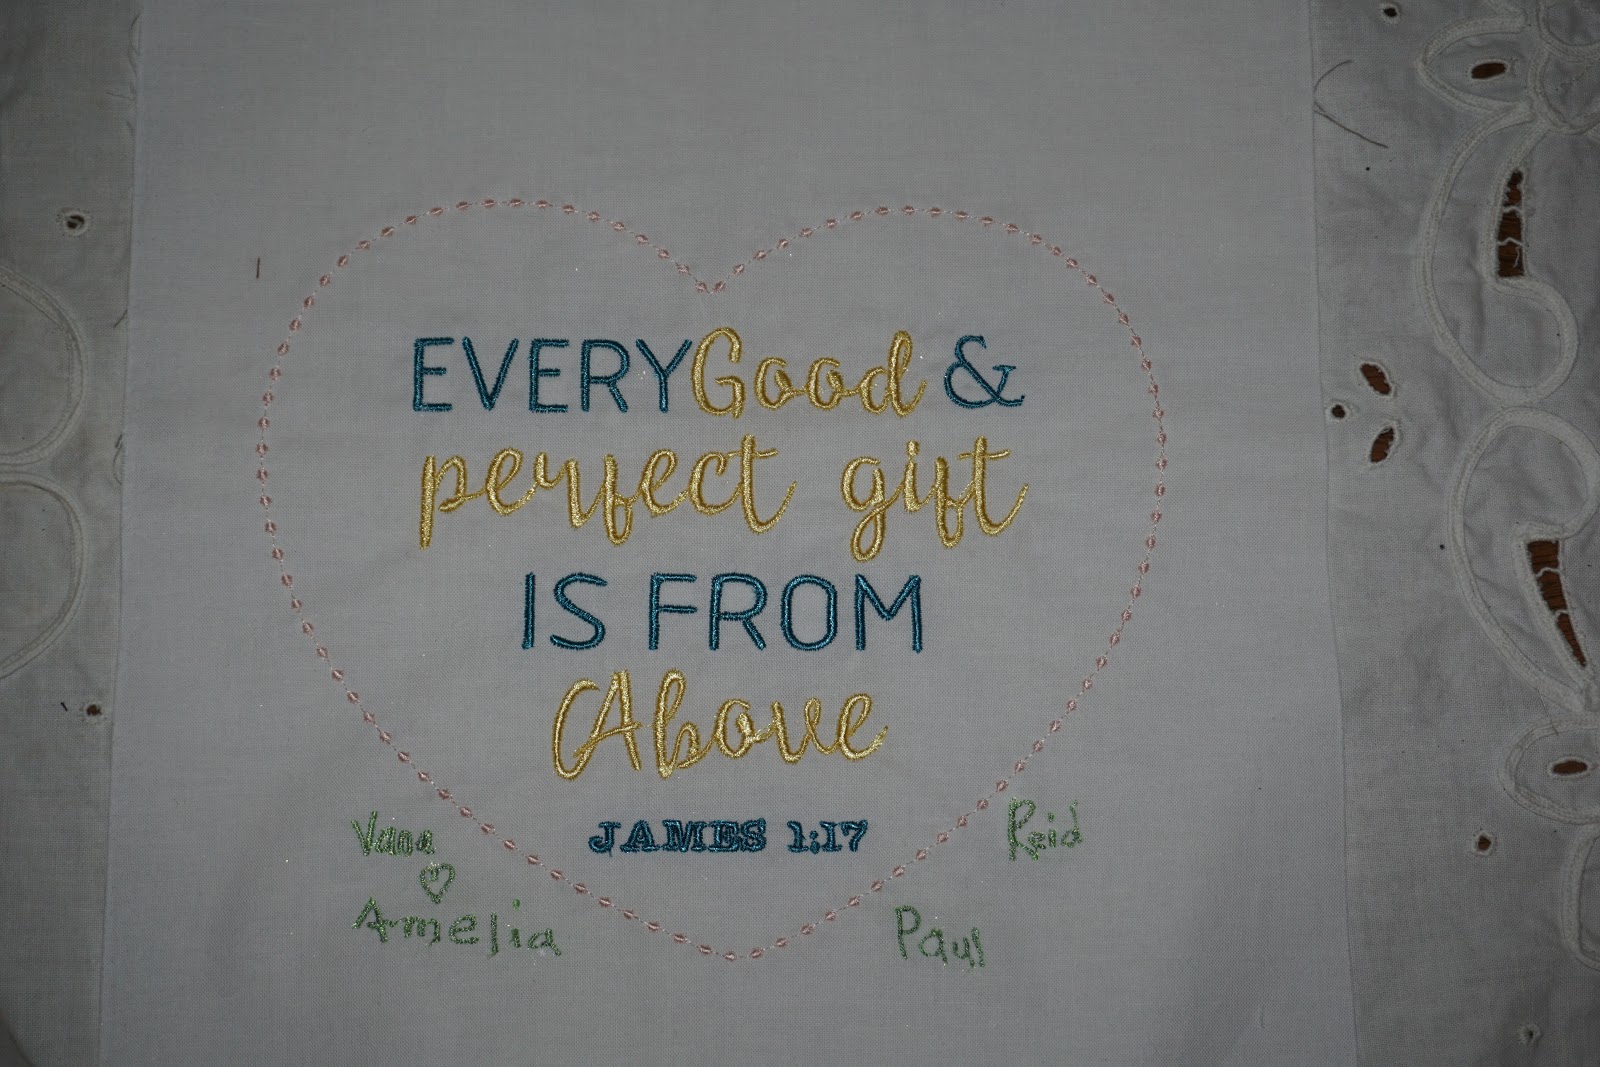
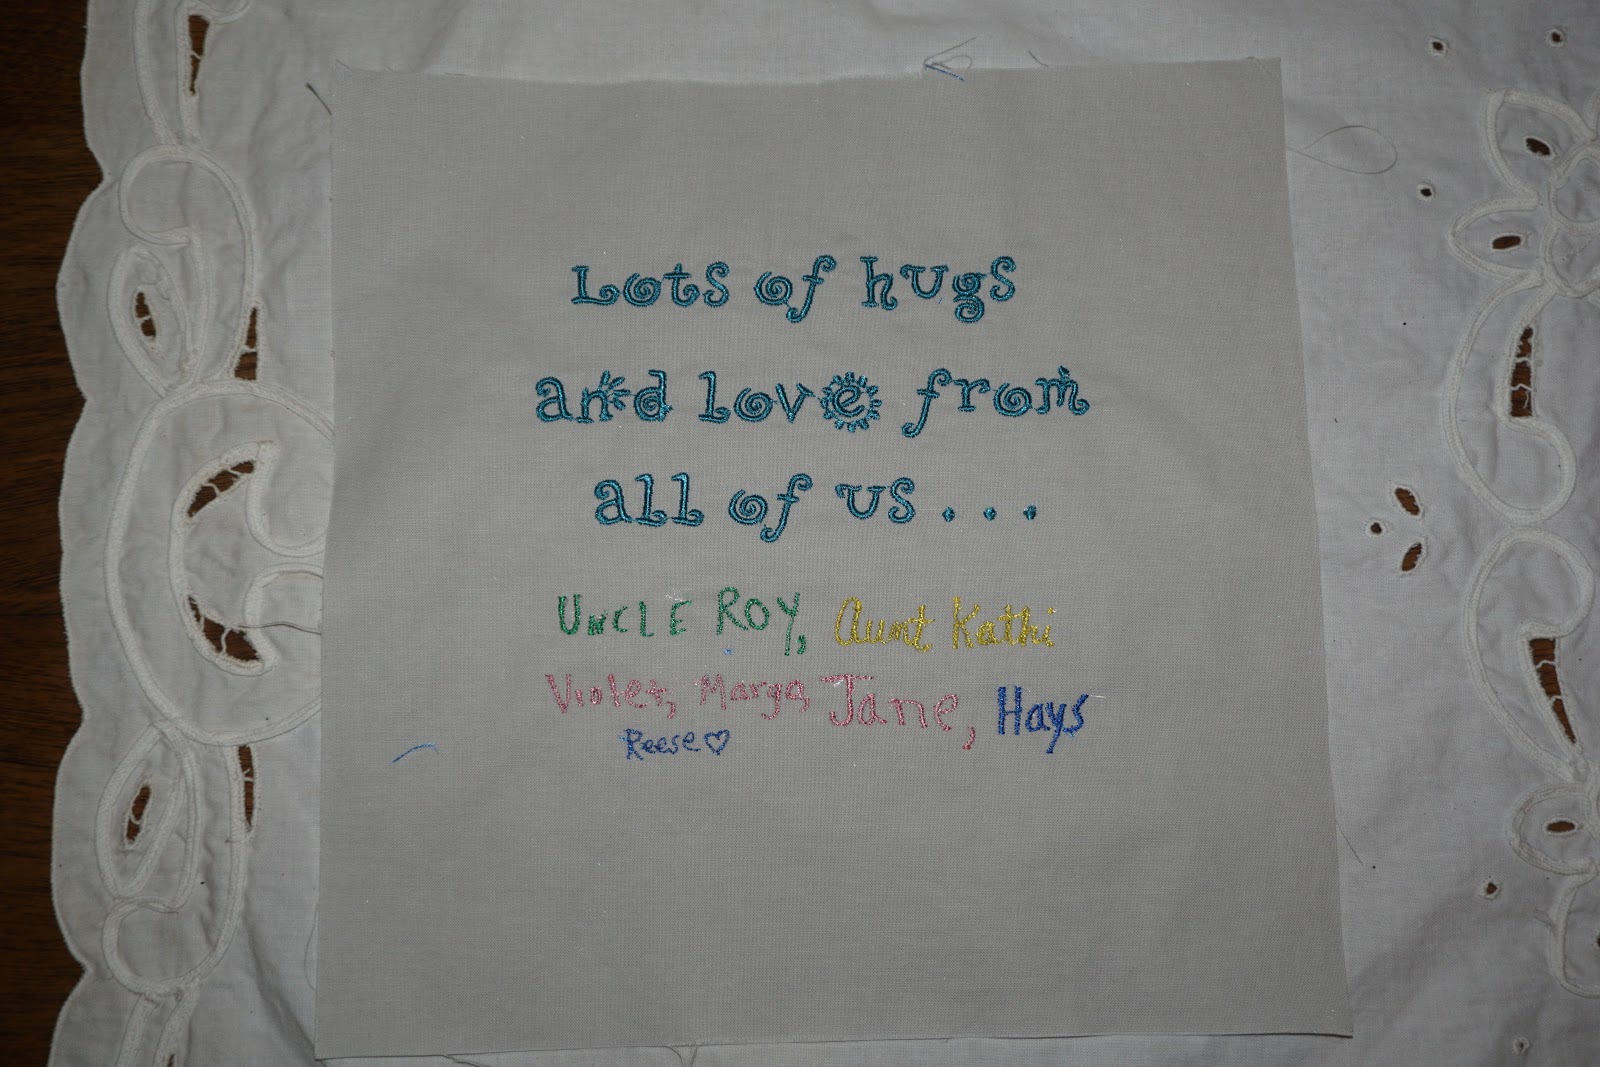
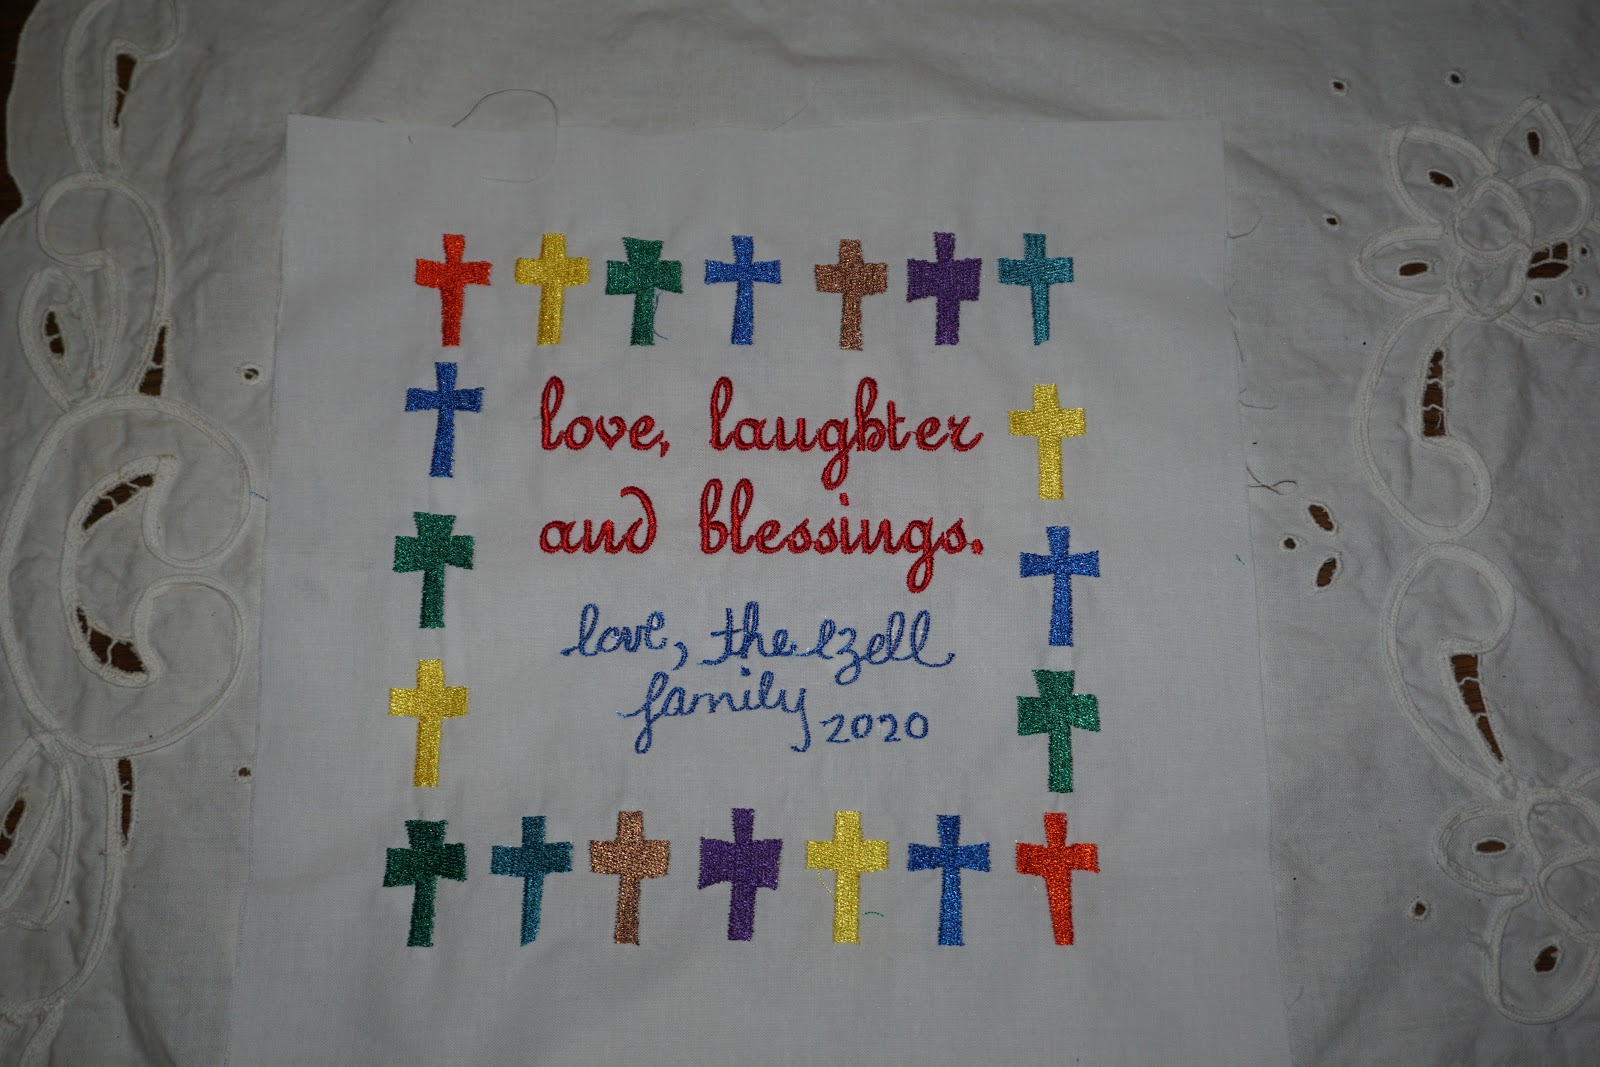
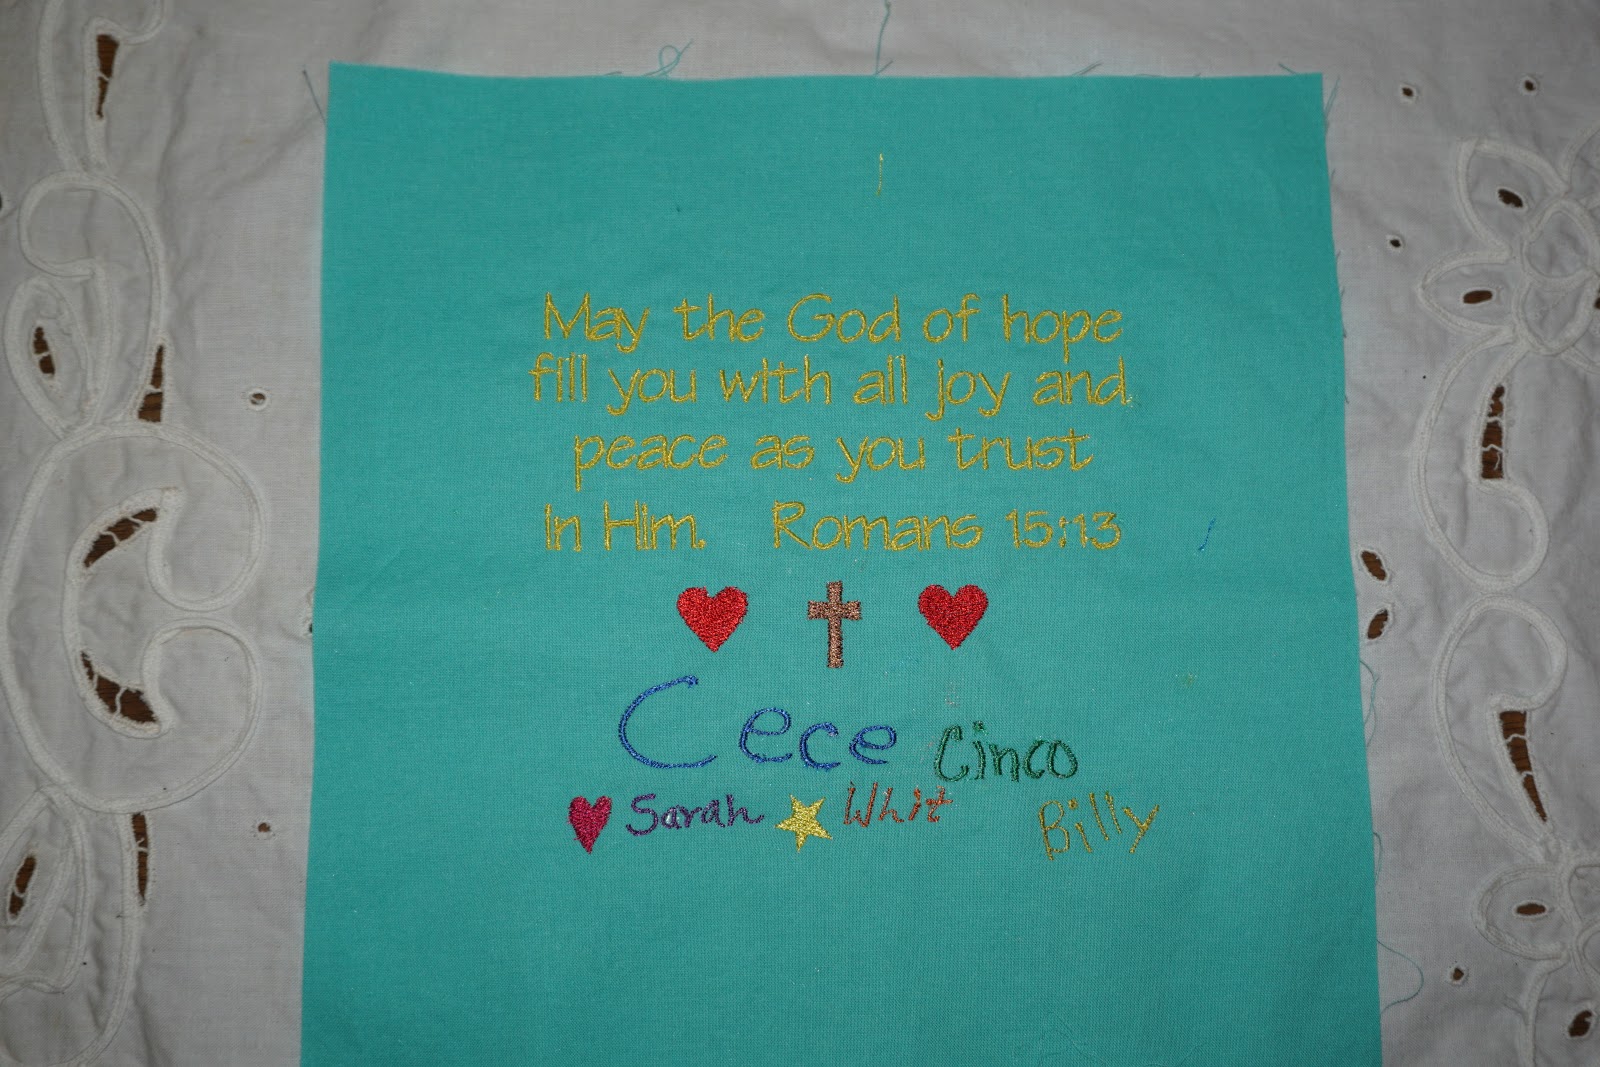
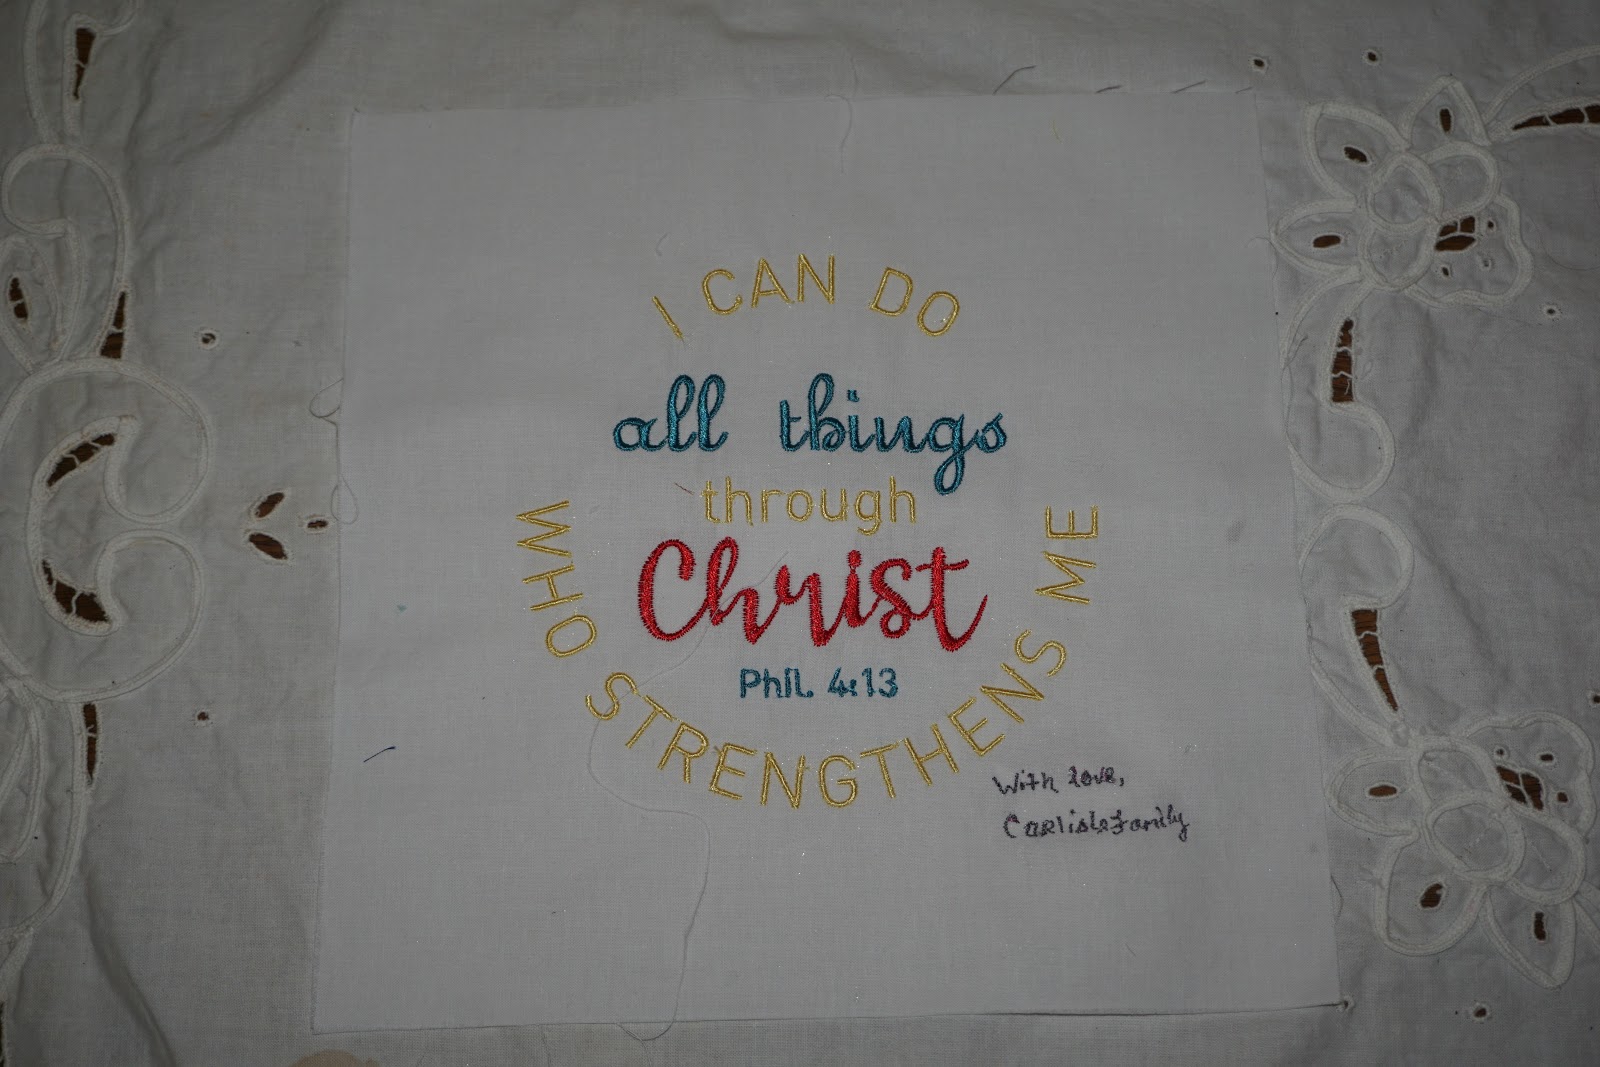
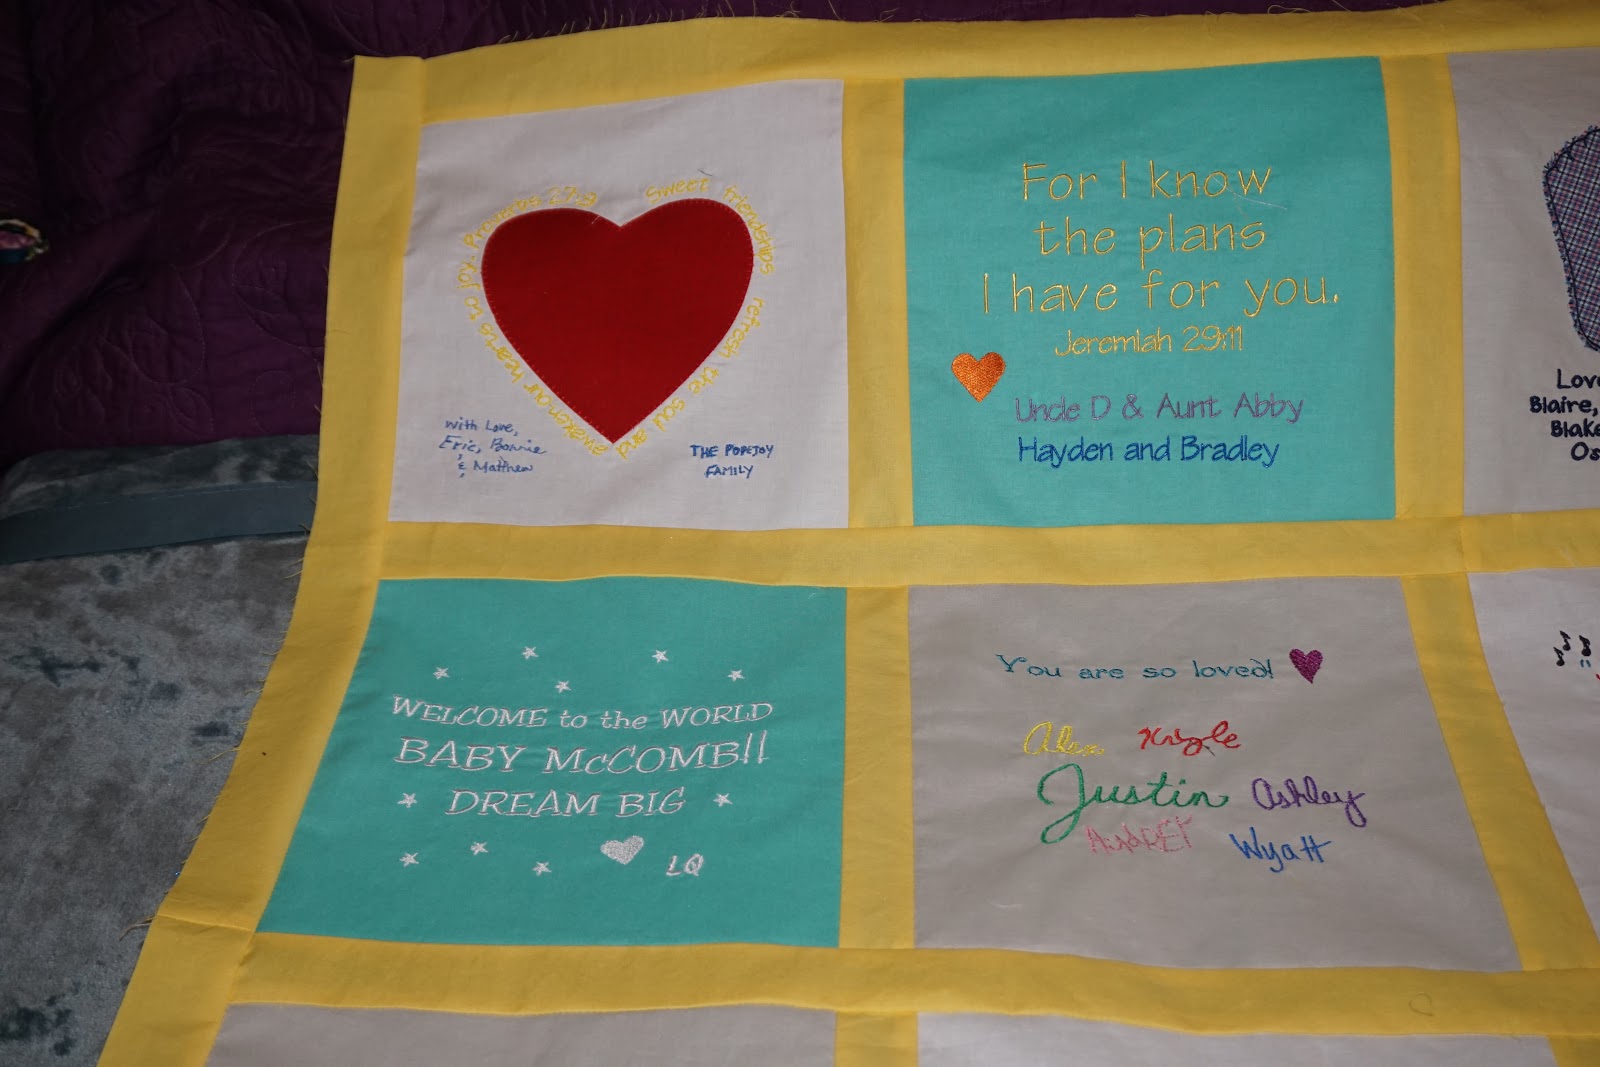
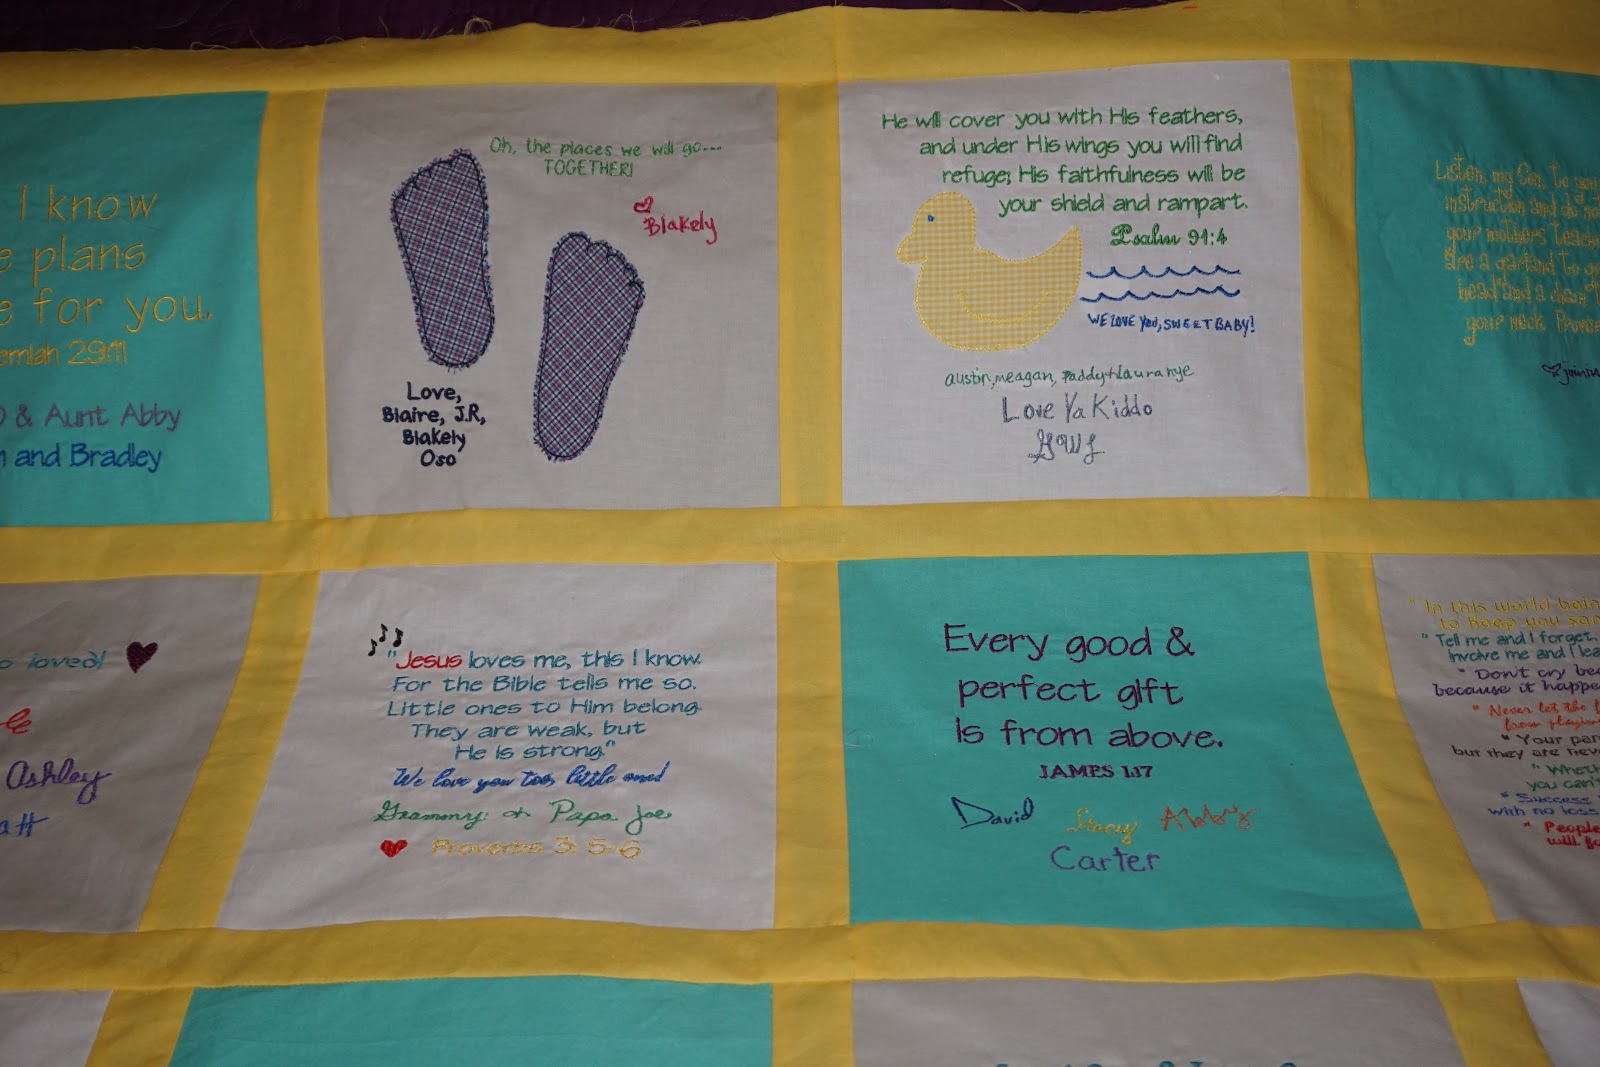
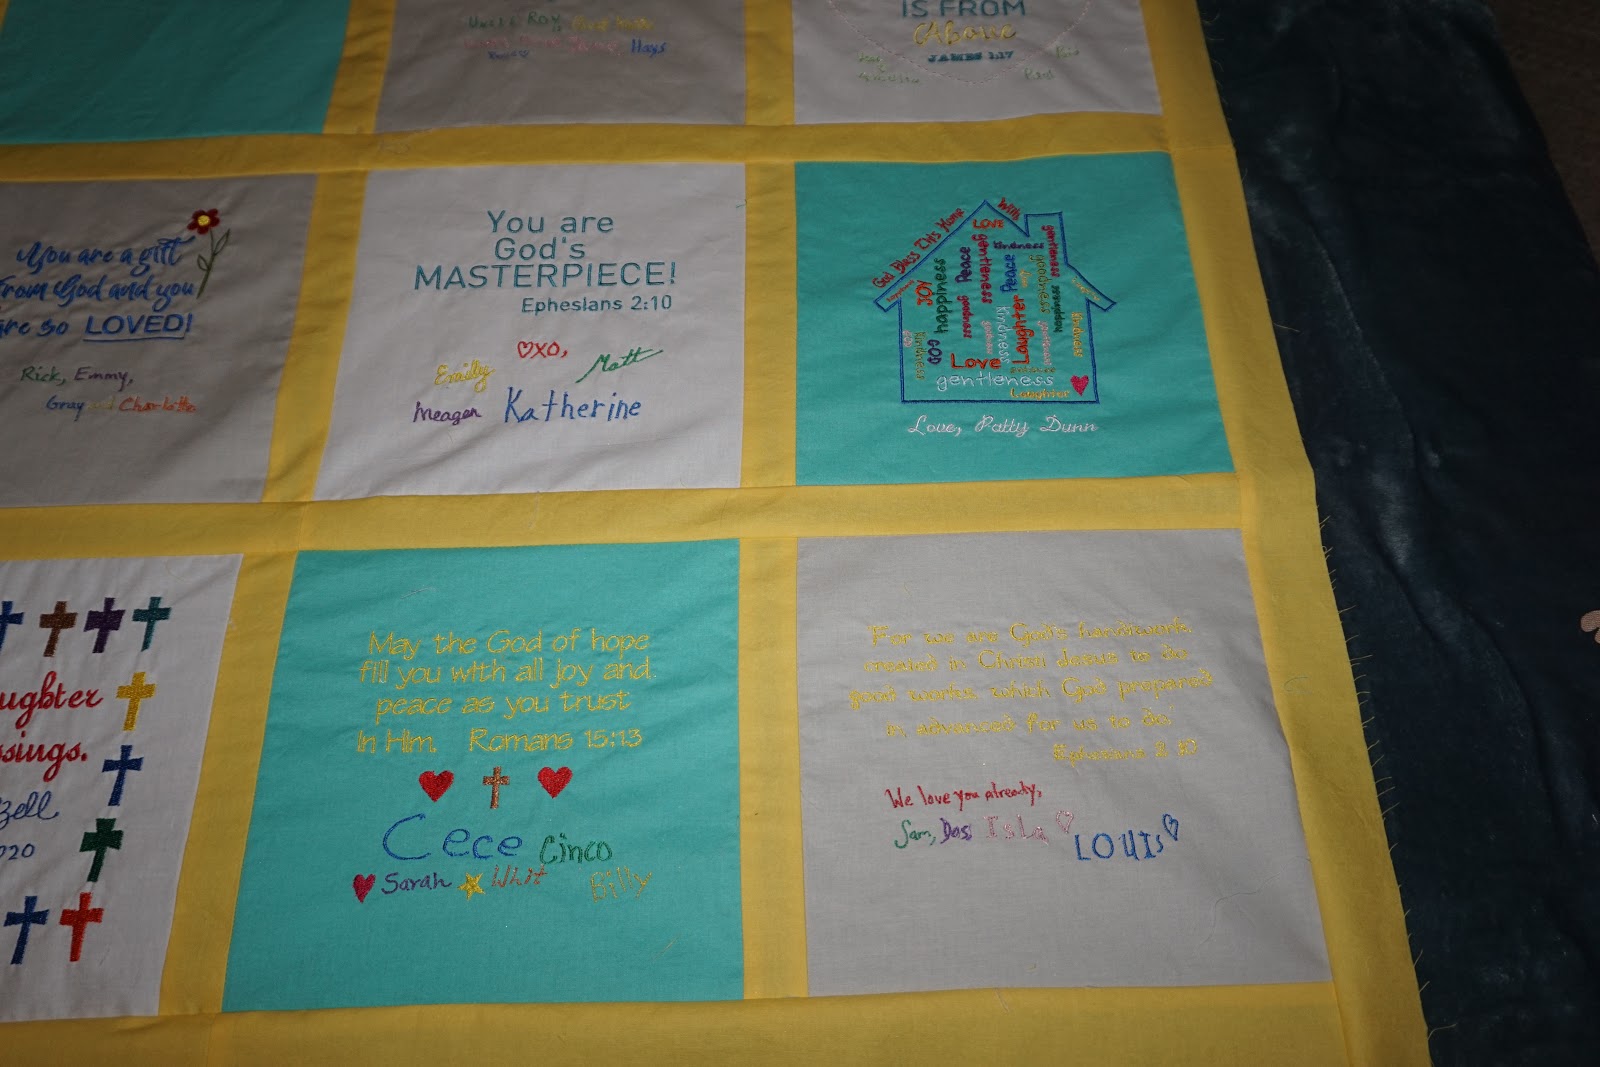
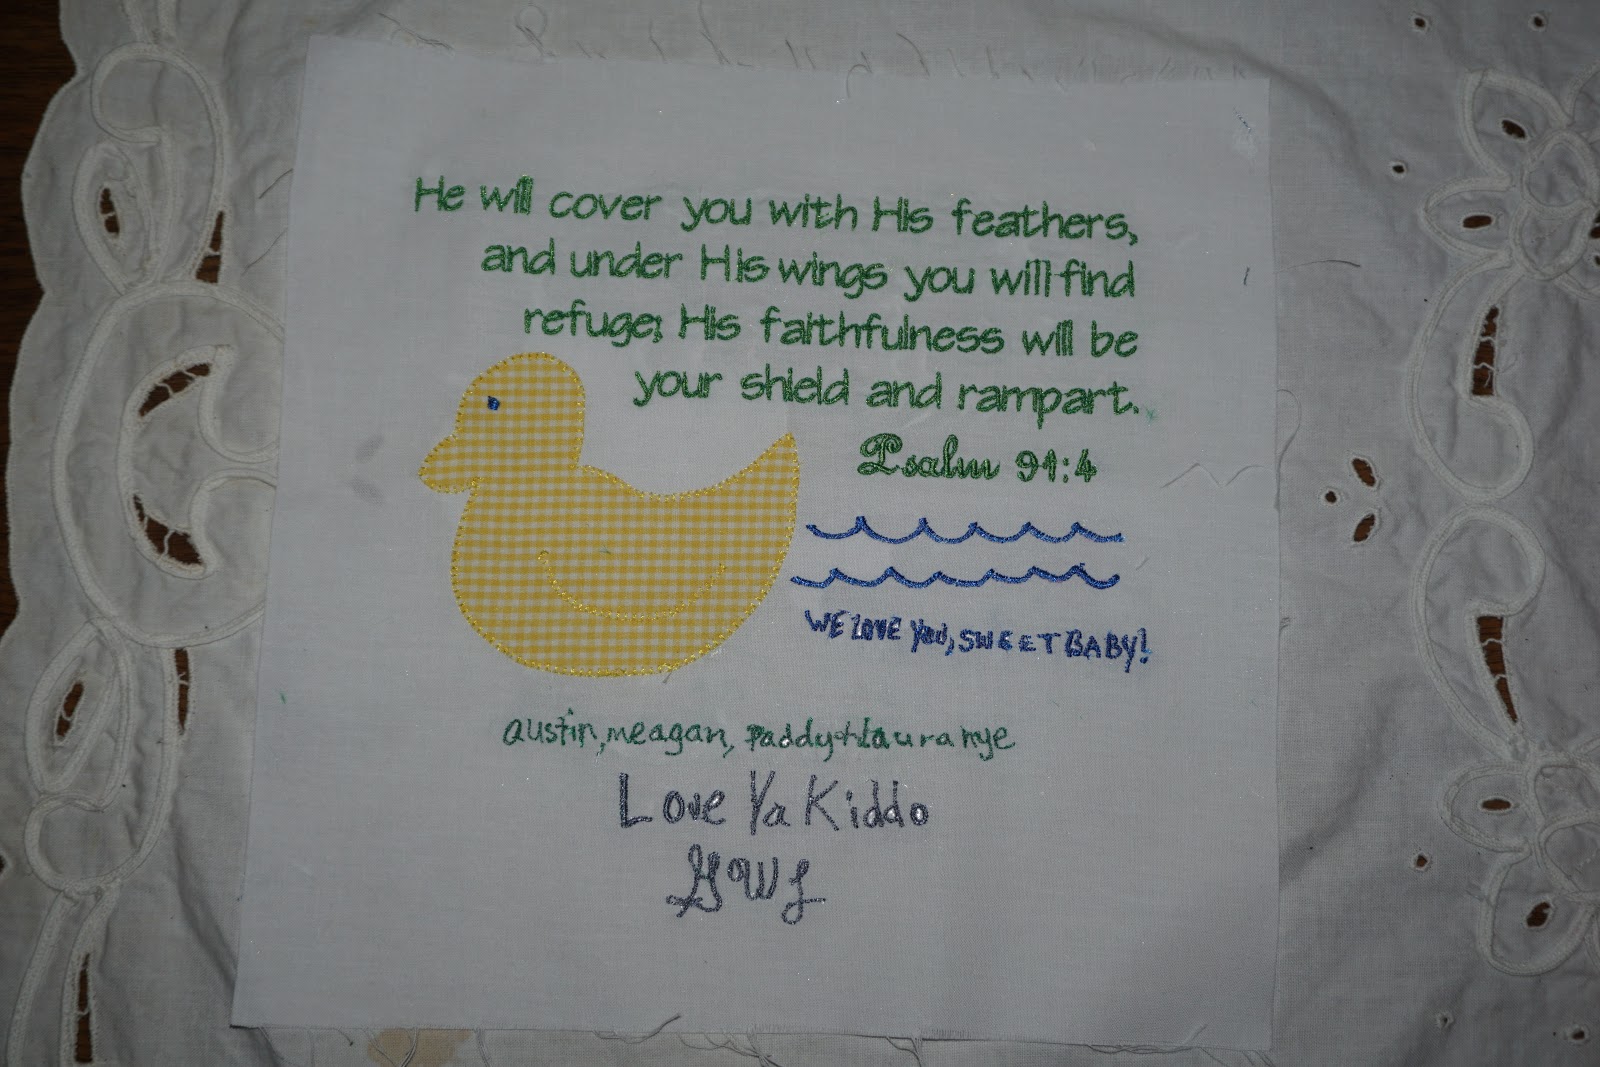
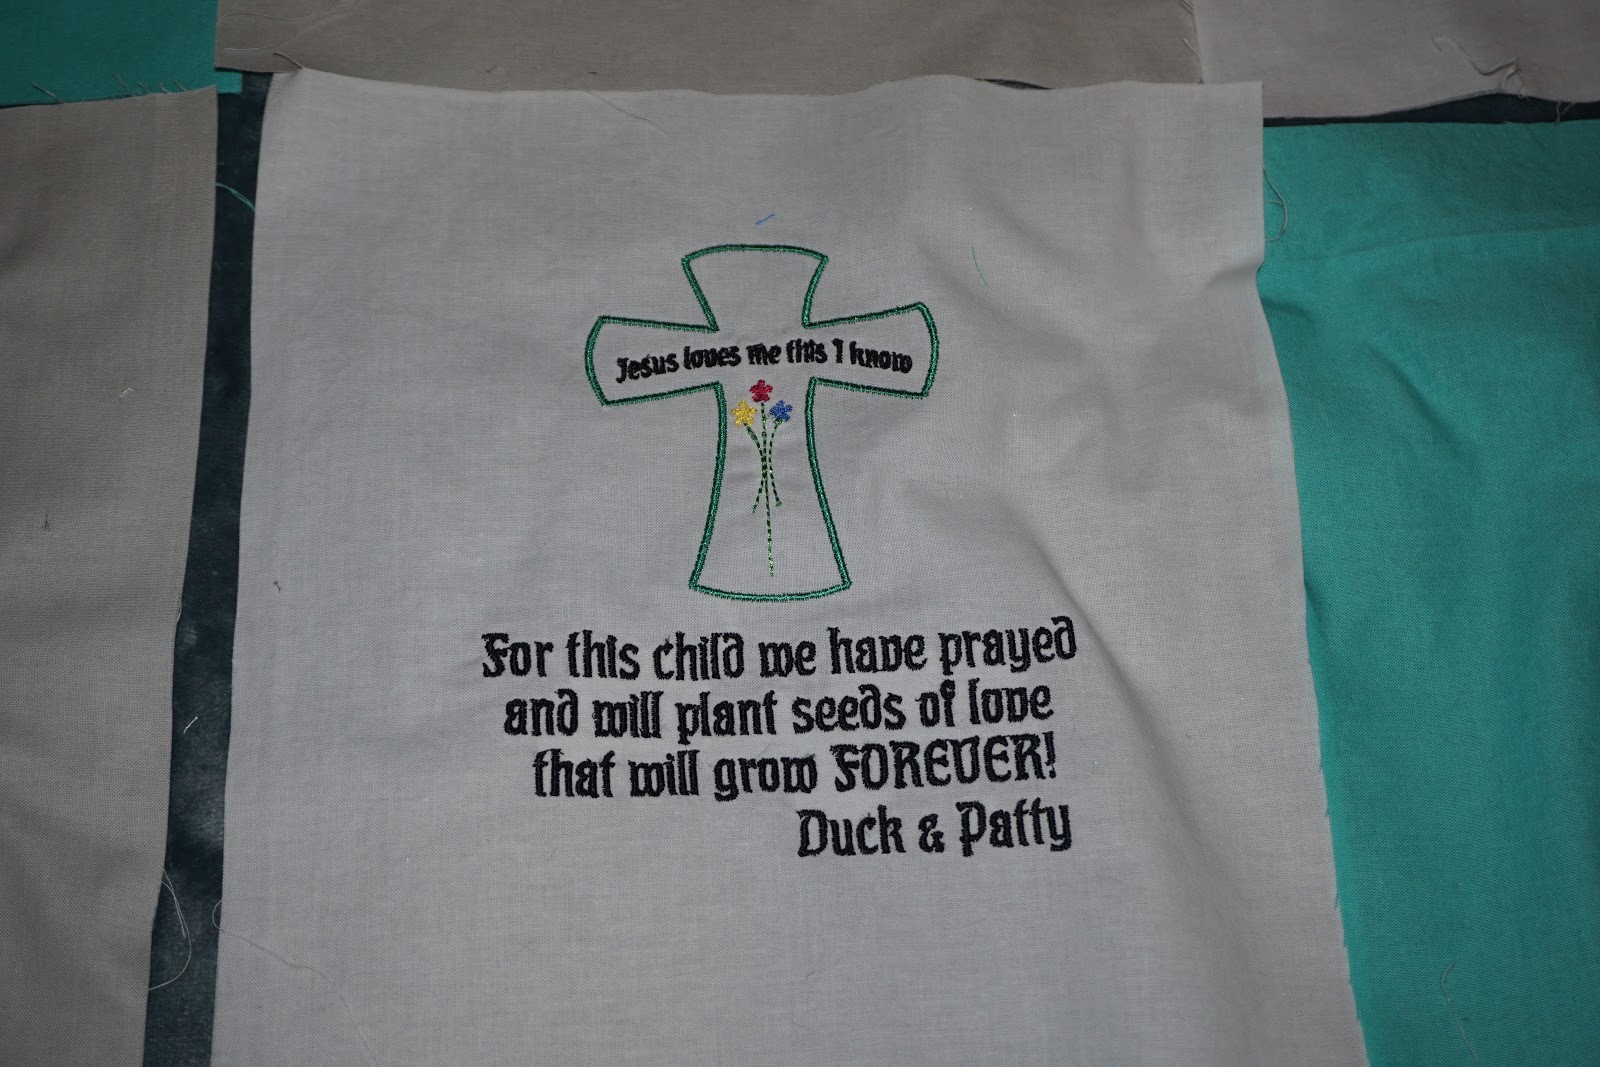
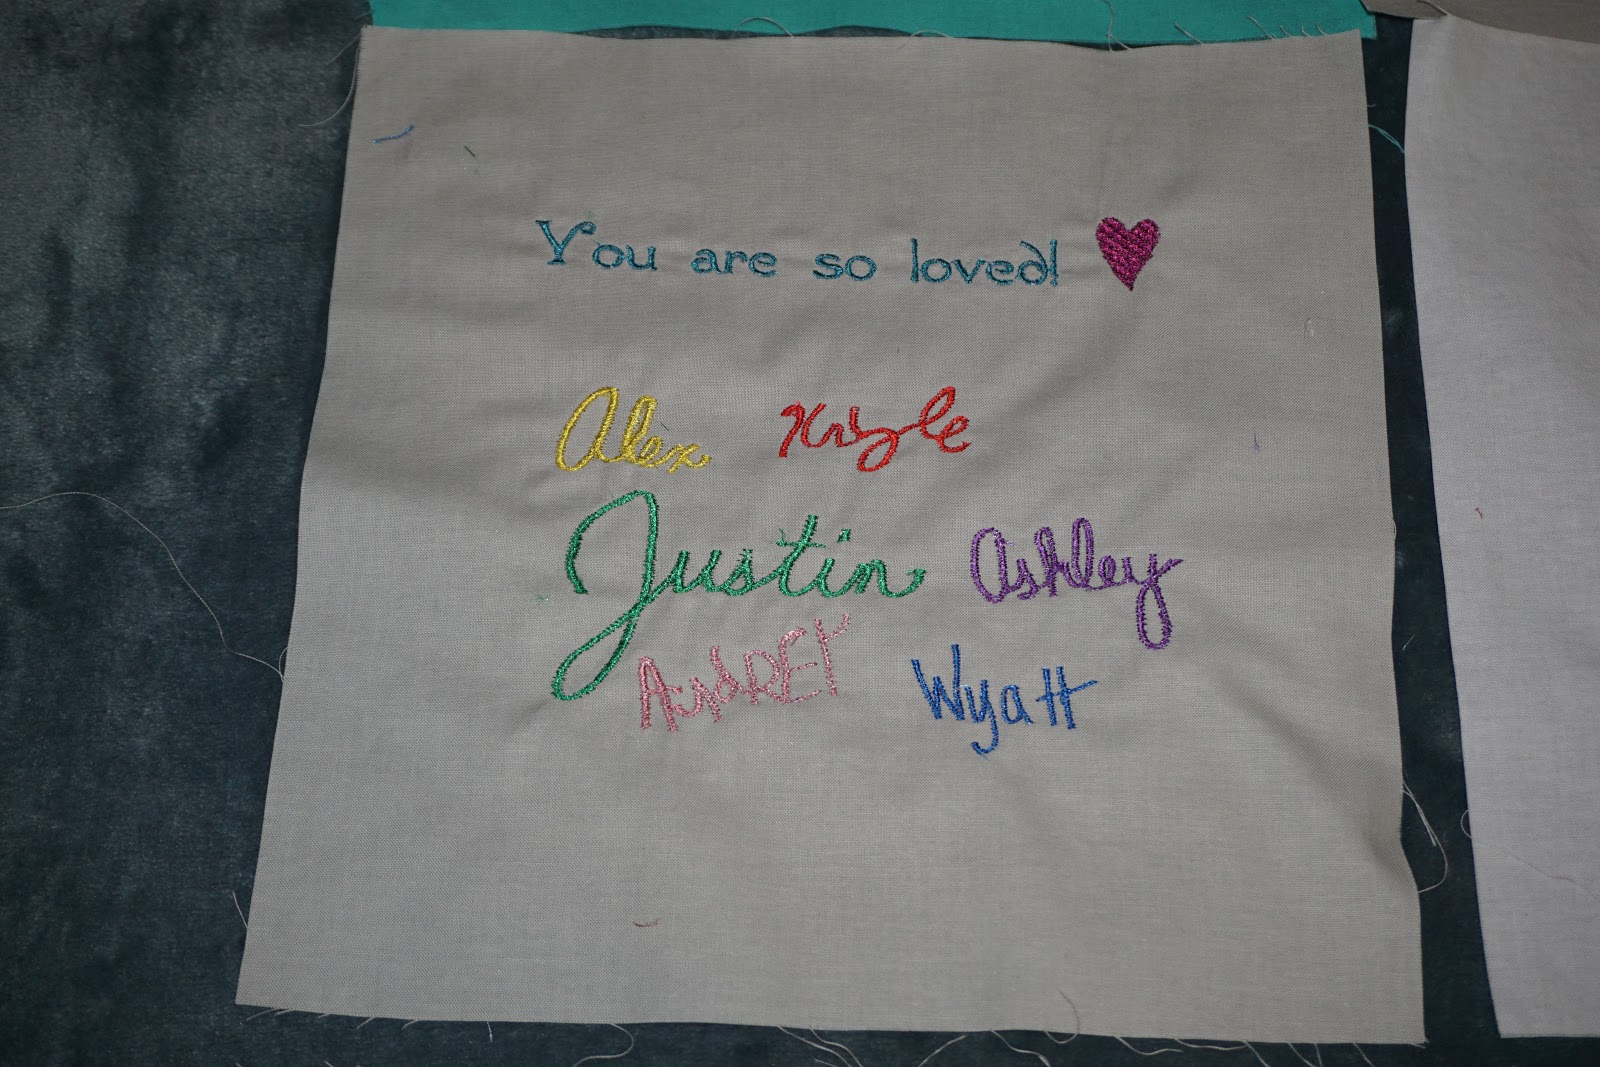
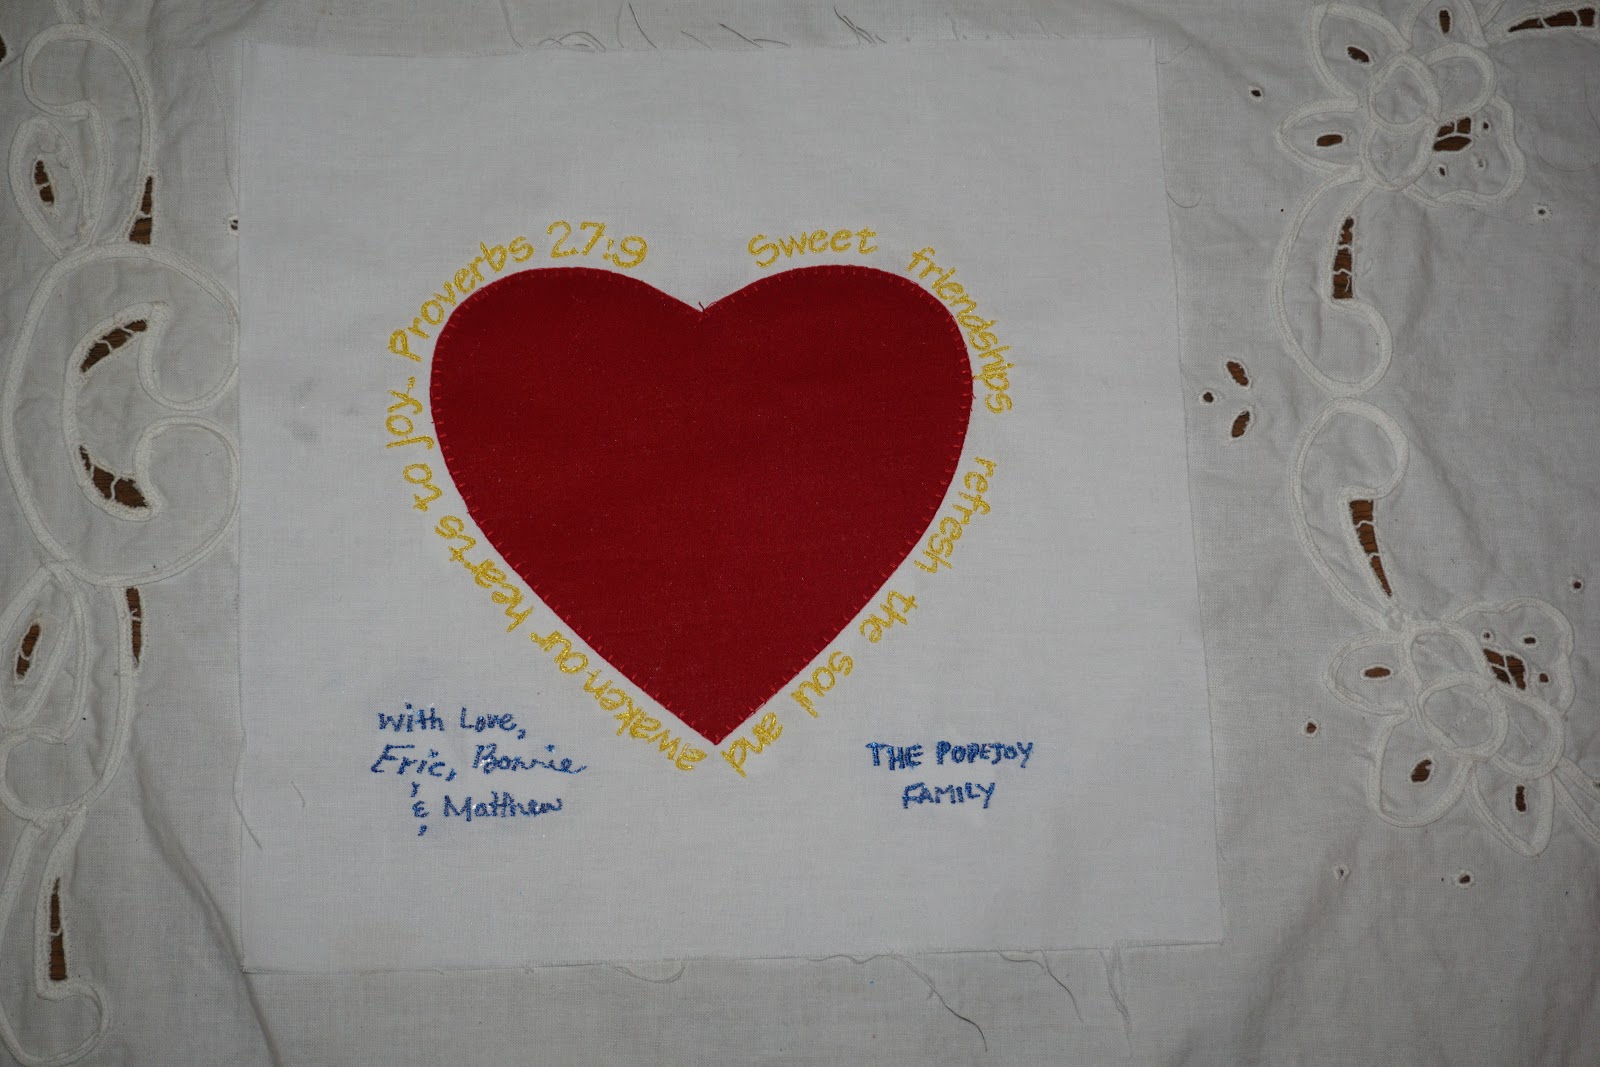
There is a new chapter in this story - one of joy. Jonathan McComb has married a wonderful woman named Monica. They are now expecting a baby and those couples how hosted a baby shower for them wanted to all be a part of a keepsake for this new baby coming into their lives. Each family wrote something special and signed their names on a piece of paper which I had bordered for the size. Some wrote verses and some made designs, all were unique to each couple or family. Even the children signed their names. The families of Jonathan and Monica were also invited to have a square. Working with my embroidery machine using similar fonts, I digitized the main part of the squares. I wanted to keep the integrity of their signatures so I traced them on "heat n gone", taped it to the fabric square and followed the signatures with free motion. Everyone had beautiful things to wish the new baby and we left a square in the middle for Jonathan and Monica to add once the baby is born. The quilt top was given to them as a surprise at the shower. I was so honored to be part of this heartfelt gift.
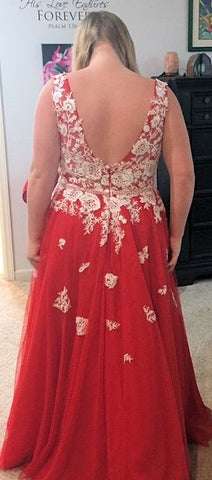
This prom dress was purchased online and was 2 sizes to big.
I will show you how I altered it to fit this young lady perfectly.
About 3" needed to come out of the shoulders. We pinned it up and I removed lace from where the seam needed to go. Basted - double checked and then stitched a secure seam. I cut the seam allowance away to 1/4" from on the back allowance and 1/2" on the front allowance. I wrapped the extra front seam allowance over the back, hand stitched it down and reapplied the lace to cover seam.
In the center front the bodice was to wide. A dart was taken up following the line of the insert. Later small pieces of lace that were taken off from the shoulder were reapplied to cover the bluntness of the seam in the center.
The back zipper was taken out but only to about 3" from the bottom of the zipper. I moved it to the pinned location and Stitched it down. This gave a dart effect and because of the fullness of the skirt all blended in nicely. This left more at the top but I closed it with a hook and thread loop.
This is how I made the loop cord.
This is how I inserted the cord to the zipper. Lace was reapplied at the top back to cover the hook.
This was all done in about 6 hrs. I got the dress on Wednesday and it was picked up on Friday.
Recently, I was asked to be part of a very interesting and heart-felt project. Many of you may have heard of the tragedy at Wimberly, Texas in 2015, where eight people lost their lives in a flood that swept a house down the river with 9 people in it. One person, Jonathan McComb, survived along with his beautiful dog, Maggie. Jonathan lost his wife and 2 children in the tragedy. He happens to be a neighbor of mine, and his mother and I are good friends. His mother suggested he contact me about a project he wanted to have made. He came to me with his wife's dress (which she is wearing in the above photo, taken earlier that year). A very good friend of theirs asked permission to name her baby girl after Laura (his wife). Jonathan wanted a blanket made from the dress. I was so happy to be part of this precious project which Jonathan had thoughtfully plan through. We visited several times to decide the right words, font and his desired plan. I was so touched by his loving heart to share his treasure.
With Jonathan’s blessing, I am passing this story and process including pictures on to you. I hope it will touch and inspire you to bless someone with your talents.
Starting with the dress, which had a A-line skirt, I knew I was going to have to be very careful about my plan. There was a seam and zipper in the back, so the only large piece to work with was the front skirt. Jonathan wanted the blanket to be the whole cloth and not pieced with other fabric. To start with, I carefully measured to find the widest part of the skirt which would be square or rectangle. Of course, that was the center front.
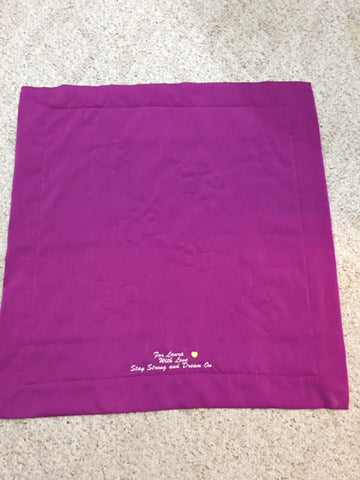
After taking the next widest and longest area from the back I realized how wide the blanket could be. I added 2 panels to extend the length knowing the grain direction would be different. Because of the skirt slant I needed to add 4 corners to make the top and bottom as wide as the center panels combined. I made I placed the corners so the grain-lines were going in the same direction as the bottom and top panels. Notice, the side panels are the same length as the center piece to build the sides out. Corners are same width as bottom and top to match the width. The finished rectangle without the border was 26” wide by 22” long.
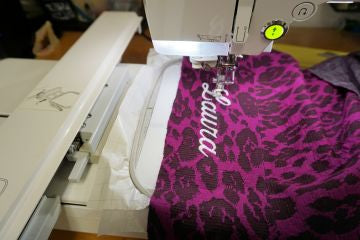
After the font was determined, the name was centered and embroidered on the bottom panel between the seam and raw edge (considering the seam allowance at the bottom).
The backing fabric was very soft brushed satin and the dress fabric was soft, but thick. I interfaced the backing with a soft fusible interfacing to add body. No batting was added. The backing was cut 40” X 36” and was wrapped to the front to add a 3” boarder which made the finished blanket 26” X 32”.
Before the backing was attached I embroidered a message from Jonathan.
“For Laura
With Love
Stay Strong and Dream On”
With a yellow heart on the side of the lettering.
Now, I needed to decide how to hold the 2 fabrics together. I cut out 3 different size butterflies from freezer paper and randomly ironed them onto the fabric (the slick side of freezer paper will stick against fabric when ironed). I hooped the fabrics to stabilize it and keep the fabrics from shifting (for machine embroidery, you hoop the fabric opposite of hand embroidery). I set up my machine for free motion and followed the edge of the paper butterflies, outlining them with a straight stitch. I made 3 hearts doing the same procedure as the butterflies. Freezer paper peels away easily when finished.
The blanket was received with smiles and tears.
His wife’s name sake, baby Laura, was born May 1, 2018.
I kept thinking: “what about Jonathan.” I felt he was giving up something that was very dear to him — a connection that he had kept for 3 years as he grieved the loss of his family. The whole bodice was still unused; so I made a bear from a Carol’s Zoo pattern which has only 2 pieces for front and back. The smallest bear fit perfectly on the bodice front and back.
I thought I was finished but there staring at me was the inside bodice lining — the outline of her shoulders and neck. I couldn’t let it go. I used a piece left from the backing fabric of the blanket to make it a square then placed batting below and stippled the lining. With the few scraps I had left, I cut out 3 butterflies in different sizes and appliquéd them to the bodice lining.
With no more of the backing fabric left, I added black satin for the pillow back, cut and appliquéd the last bit of the dress fabric into the shape of a dress.
My carefully thought out efforts were well—received. While I was the one who stitch these loving gifts, I must say it was all God—led from the minute I walked into the store looking for a backing fabric to the last stitch of the pillow. I wish Jonathan peace and comfort. He is a very special person and I was honored to be included in this special project!
Wind the bobbin slowly and evenly by holding your finger around the tension disk.
Do not fill bobbin all the way.
Purchase an extra bobbin case.
Loosen the tension screw.
Mark the case so you know it is for thicker threads.
Slide thread into slot pulling it toward you and then up into the spring. Be sure bobbin rotates freely - If not pull bobbin out of case and thread it again.
Sew on the WRONG side of the fabric.
A 8" X 10" fabric will make a new front for your Cross Talk Cell Carrier.
There is often a problem with the color of a lace. If it is white it looks dressy or it doesn't match the fabric. Here is a jacket (Bias Jacket) that has white lace I painted to match the fabric. Since there were many colors to work with I just kept applying it with all the colors of Dye-n-Flow paint by Jaquard. Some of them I mixed to get a deeper tone. This is a very watery dye type paint that will work with natural or synthetics. Watch the video's on how I did it.
My new vest pattern called "The Long and the Short of It" is easy to make and comfortable to wear. I have made it from all kinds of fabrics from rayon to polyester chiffon. The easiest is making it from 2 pashmina scarves. Because the scarf is interesting on both sides, I made a flat seam so it could be reversible. Here is the video on how I did the seam. Make this pattern up in your favorite fabric by April 30, 2016, send me a picture and you will get your name in a drawing for a pair of 10" serrated KIA scissors (valued at $89). Drawing will happen on May 1st.
One of the hardest things to get through is the loss of a loved one. Especially children when one of their parents passes away. My father wore many pull over sweaters as he got older and as my mother was getting ready to put these sweaters in the good will box I kept thinking how beautiful the patterns and colors were. Not knowing what I would do with them I grabbed them and brought a whole suitcase home with me. As I began to think about what to do the plan came to cut them in sections making pillows for close family members.
One of the important things to know is the sweater needs to be stabilized. A light weight fusible knit interfacing works best. Be sure and press firmly lifting the iron in sections rather then gliding the iron.
Determine where you want to cut the sweater. If you want to test before cutting, take a picture of the sweater and print it as a 8 X 10 and cut it up into the sections you think you want. This will help you visualize what will happen before you cut.
using the shoulders and neck this pillow has a card with it that says "Put your head on my shoulder"
This pillow used the middle of the sweater "Put your arms around me and give me a hug"
This used the arm of the sweater - "My arm is around you"